

| (530) 265-4485 |
| Lora 1956 Romer Canned Ham Restoration |
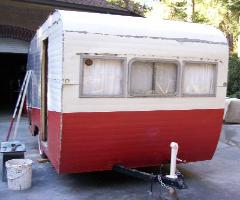
Passenger Side Front Rear Driver's Side Entrance Just Inside Entrance Door Driver's Side Interior Kitchen Driver's Side Interior Above Kitchen Sink Front Interior Dining/Couch Area Upper View Front Interior Dining/Couch Area Lower View Interior Rear Bedroom Interior Passenger Side Interior Ceiling Interior Ceiling Vent Interior Original Floor |
| "ROMER'S Before Pictures" |
| "ROMER's Week # 1: |


Removed Exterior Lights (Interior Couch & Bed Removed For Access) |


Pete and Joe Sitting on the couch they took out to access front lights for removal. Took the Door Off Passenger Side Skin Removed Driver's Side Skin Removed Rear Skin Removed (Skin Remaining is the Roof Piece) Pete Working On The Front Skin Removal Front Skin Removed (Skin Remaining is the Roof Piece) |


| "ROMER's Week # 3: |
There goes the Old Roof Here we are showing Structural Repairs (Wood Rot Damage) Notice the new hole! Your Refrigerator goes here. We found a nice vent for it! Bye Bye Ice Box This is the Dining Area with everything removed. Notice the Window Seals ..... We Stripped Them Window Seals Stripped (Yikes - Big Job ! ) Cubords & Drawers Removed ..... New Ones are "In The Works" Door Completely Taken Apart |


Plumbing & Electrical Work in the Refrigerator Area Interior Paneling Delivered Exterior Siding Delivered Pete Prepping the Paneling for Lacquer Joe Spraying Lacquer Each Sheet Gets 3 Coats Finished Siding This Piece Needed a Little Extra Sanding Here we show the bedroom area. Storage area made under the bed and painted white. Putting in the Paneling The Paneling will really lighten things up Old vs New Sleeping Area Shown with New Paneling All of the Framework for Cabinets and Drawers have been painted red The Cabinets and Drawers will match the paneling only they will be a Glossy (Very Glossy) Finish This is the cabinet that held the old ice box and is where the refrigerator will go Kitchen Sink Area View of Kitchen Area from entrance |


| FRIDGE GOES HERE |

(Before)

(Before)

(Before)
Kitchen Window
| "ROMER's Week # 2: |
| "ROMER's Weeks # 4 & 5: |
| "ROMER's Weeks # 6 & 7: |
Staining the Interior Trim Installing the Interior Trim Wood Trim and Polished Aluminum Trim Installed (Above Sink/Stove) Wood Trim Installed (Refrigerator Cabinet) Polished Aluminum Trim added to Refrigerator Cabinet Wood Trim and Polished Aluminum Trim added to Overhead Kitchen/Stove Cabinets Overhead Dining Cabinet (The Cabinet Doors will match the walls only will be much shinier) (Before) Rear Section Detail More Detail More Detail Dining Area Seating Rebuilt Plywood Floor Installed (on top of old floor) Seating Cabinet in Open Position Seating Cabinet in Closed Position Mount for Table Top Table Top will be Red just like the Kitchen Counter Top you selected Another Coat of White Paint Under Bed Drawer Detailed and Trimmed Close Up (Last Weeks Picture) Rebuilding the Hitch and Tongue That's Diamond Plate The Gray you see is Primer and will be painted Red That's one of your old Propane Bottles Painted Silver/Gray and sprayed with a clear coat to give it the shine Your Old Bottles Your Window Frames Newly Painted Window Frame Sprayed with Clear Coat for a great shine This is what the window frame will look like up against the wood |
OVEN
GOES
HERE
GOES
HERE


STOVE TOP
GOES HERE
GOES HERE
| SINK GOES HERE |

| "ROMER's Week # 8: |

Interior Window Frames in Dinette Area Installed Dinette Seating and Extra Sleeping Area Completed (Still need to Stain) Passenger Side Aluminum and Corrugated Siding Installed Imagine Blue being Silver and White Being Red Driver Side Aluminum and Corrugated Siding Installed Sample of Aluminum Siding Exposed Trailer Front Aluminum and Corrugated Singing Installed The Insulation you see will also be Aluminum Where the White Ends the Aluminum Begins Trailer Rear Aluminum and Corrugated Siding Installed The Insulation you see will also be Aluminum Close Up of Refrigerator Access Door seen on above Passenger Side Photo Close Up of Under the Bed Access Door seen on above Passenger Side Photo Close Up of Water Access Door seen on above Driver Side Photo Your Chrome Window Frame Delivery Close Up (Really Look Good!) More Detail on the Tongue Hitch area Notice the Chrome against the White that was done this week Action Shot of Pete cutting Aluminum for the Roof Action Shot of Joe adding more strength too the roof in preparation for the aluminum The top center of the roof will be the corrugated siding but will not be visible |


| This Blue Film Protects aluminum during construction |
| White Will Be Painted Red |
| This Insulation will also be covered in Aluminum |
| This Insulation you see will also be covered in Aluminum |
Aluminum
| "ROMER's Weeks # 9-13 Not Shown |